Reading this blog is akin to a Vodka fueled evening. Seems completely harmless at first and suddenly you will wake up somewhere unfamiliar, most likely with some kind of delicious pastry or in your kitchen inspired to cook!
Tuesday, May 1, 2012
Almond Butter Drops
Wednesday, February 22, 2012
Double Chocolate Freckles
Carmen of Awesome's birthday is upon us again and to help celebrate I decided to make these Double Chocolate Freckle Biscuits, as there are very few things happier than a bag of hundreds and thousands. This recipe is from the Australian Women's Weekly Cookies and you'll need to be prepared to giggle like a school girl as you bake as they are just so much fun Beat 125g soften butter, 3/4 cup brown sugar and 1 egg with an electric mixer until combined. Then sift in 1 1/2 cup plain flour, 1/4 cup self raising flour, 1/4 cup cocoa powder and gently combine. To fully combine the dough you will need to knead it with your hands.
Take a sheet of baking paper, grease and gentle flour the surface and roll the dough until it 5mm thick. Cover it with baking paper and chill in the fridge for 30 minutes. Then preheat the oven to 180°C/160°C fan-forced and cut the dough using 3cm round cutters and place them on grease cookie sheets.
Bake the discs for 12 minutes and when they start to firm up on the trays, move them to a cooling rack to complete the process. Though they appear soft and under cooked, I promise that the sugar will set them and you'll be left with delicious chocolaty slightly chewy cookies.
Melt 200g of 70% dark chocolate and pour 1/3 cup of hundreds and thousands into a shallow dish. Coat the plain discs with melted chocolate, dip it into your dish of technicolour goodness and allow them to set. Voila! The most amazing, happy biscuits ever! So simple, but so much fun!
Friday, February 17, 2012
I Dream of Biscotti: Update
However I can inform you that this recipe from the Joy of Baking and passed onto me by Yens was met with approval. It retains a wonderful chocolate taste and I replaced the instant coffee with two tablespoons of finely grated orange zest. Despite how disgusting biscotti dough is, I would recommend that you make the time to halve the dough and place it on two lined baking sheets as this recipe expands quite a bit. So if you like your Chocolate Hazelnut Biscotti with a light crisp finish, this recipe is for you. But since I prefer mine slightly harder and chewier, the quest for perfection continues!
Thursday, February 2, 2012
I Dream of Biscotti
Due to time constraints, I'm thinking of making biscotti. As avid readers of my blog know, I'm fantical about these treats and though I've tried numerous recipes I am yet to find a Chocolate Hazelnut Biscotti recipe that comes close to the wow factor of Phillippa's Chocolate Hazelnut Orange Biscotti. I feel my downfall is the lack of melted chocolate and/or additional chocolate pieces. So are you a gun biscotti maker? Do you have any suggestions on how to really infuse that chocolaty taste into this Italian treat? Then I want to hear from you!
Tuesday, January 10, 2012
Lemon Polenta Biscuits
To begin preheat your oven to 200°C and line and grease two baking sheets. Then place 200g of soften unsalted butter, 150g caster sugar and the finely grated zest of two lemons in a mixing bowl and beat until creamy.
Then add two egg yolks, one at time to the mixture. Beat well with each addition.
Then sift two cups of plain flour and one cup of polenta and beat until combined. Gently shape the dough into a ball, wrap in plastic wrap and chill for 30 minutes or until firm. When the dough is chill, roll it out on a floured surface until it is 5mm thick and cut out circles using a 6cm pastry cutter. Then take a palette knife and gently lift them onto the baking trays. Bake for 10 - 12 minutes or until golden and cool.
Here are the finished product, all labelled up with my very simple branding. Please excuse the dates on the label as it clearly highlights how tardy I became in the later part of 2011. But I'll honestly try to be better with my updating as I only made one sweeping New Year's Resolution: to have my cake and eat it too!
Sunday, January 8, 2012
Honey and Pistachio Biscotti
I currently have an over supply of pistachios so I've been making friends these Honey and Pistachio Biscotti from Taste.com.au. Preheat your oven to 160°C, line and grease a baking tray and measure out 1 cup of unsalted pistachio kernels. Chop half of them with a sharp knife and place in a large mixing bowl with 1 cup of plain flour, 1/4 teaspoon of baking powder, 1/4 teaspoon bicarbonate soda and 1/3 cup of caster sugar. Mix the dry ingredients before adding 2 tablespoons of honey and two tablespoons of cold water. Using your hands, combine until you have a sticky dough.
Mould the dough into a long flat log and bake for 20 minutes or until the log in golden and firm. Remove from the oven and allow the log to cool. Then using a serrated knife, cut the log into 0.5cm slices and place them in a single layer on two trays. Reduce the oven to 130°C and bake them for 15 minutes or until browned and firm. Remember to turn them occasionally and be careful not to burn the pistachios. Monday, August 22, 2011
Cranberry and Pistachio Biscotti
I'm a harden biscotti addict so when I spotted this recipe on Taste.com.au I knew I had to try it, but I've made a few tweaks along the way which I thought I would share with you. First beat together two eggs, 1 cup of caster sugar and the finely grated rind from 1 lemon.
Then combine 1 2/3 cup of plain flour and 1 teaspoon of baking powder until you have just formed a dough. Then mix through 1 cup of raw shelled pistachio and 1/2 a cup of chopped dried cranberries.
Divide the dough into two smooth even logs and rest on a greased lined baking tray. Place the tray into a preheated 160°C oven for 30 minutes or until golden. Remove from the oven and cool for 20 minutes before slicing them in 5mm pieces with a serrated knife. Reduce the oven to 120°C and place the slices in a single layer on 3 lined baking trays. Bake for 20 minutes or until crisp.
Monday, August 15, 2011
Almond and Rosewater Shortbread
We have a lot of morning teas around my workplace and sometimes I simply don't have the time or inclination to whip up some elaborate. These Almond and Rosewater Shortbread are just solution as they are a breeze to make, all the ingredients are in my pantry and they look great. Start by preheating your oven to 160°C and lightly greasing two baking trays. Take 180g of soften butter, 3/4 cup shifted icing sugar mixture and beat until pale and creamy.
Then add 100g almond meal, 3/4 cup plain flour, 1/4 cup white rice flour, 1/4 teaspoon ground cloves and stir until well combined.
Use your hands to gently roll the mixture into 8cm long and shape into crescents. Pop them into the oven for 25 minutes or until cooked through and just starting to colour. After removing them from the oven, brush them with rosewater and allow them to cool on the tray.
Dust them with a generous coating of icing sugar, top and bottom and enjoy. They keep well in airtight container our of direct sunlight for up to five days.
Saturday, June 25, 2011
Rhubarb Custard Melting Moments
To truly appreciate food you have to know how to cook and Food Bloggers are no exception. With the upcoming Brisbane Food Bloggers Picnic I knew I had to plate up something unique, tasty and visually splendid so I turned to my book shelf. I settled on Rhubarb Custard Melting Moments from the Women's Weekly Cookies cookbook as there something so appealing about the bright red rhubarb custard nested between two golden discs. I started by stewing 3 large stems of chopped rhubarb with 3 tablespoons of sugar and three tablespoons of water on low heat until the rhubarb was pulpy. Try to avoid taste testing as you could quite easily polish off the stewed rhubarb at this stage.
I then placed 2 tablespoons of custard powder, 2 tablespoons caster sugar and 1 cup of milk in a saucepan. I stirred it until the mixture boiled and thickened. Once I was happy with the consistency I removed it from the heat and added 2/3 cup of stewed rhubarb and was disappointed with the colour.
Thankfully my red and pink food colour pastes came to the rescue and gave the custard the desired colour. Once the custard had cooled, I covered the bowl in cling wrap and placed it in the fridge to set.
I preheated to 160°C before whipping 500g softened butter, 1 teaspoon vanilla extract and 1 cup of sifted icing sugar until light and fluffy. I then sifted in 2 cups of custard powder and 2 cups of plain flour and combined. Saturday, April 16, 2011
A TARDIS took my finger!
"I need you to close your eyes. I need you to imagine the impro workshop has started and you're a Mum. Your child has zero artistic talent and has presented you with a REALLY ugly drawing but because it's your child, you're going to love it." - Actual dialogue. My friend Amy is smart, gorgeous and amazingly has put up with me for the best part of a decade. Today is her 26th birthday and being a huge Doctor Who fan there was only one gift that would do ... a Gingerbread TARDIS. TARDIS stands for Time And Relative Dimension(s) In Space is a fictional piece of technology used by various time lords in the series. Here is my TARDIS template which I constructed from thick cardboard ... so far so good.
I decided to follow the same Gingerbread recipe I used for my Ninjabread. So here is a photo of 250g butter with 1 cup of brown sugar beaten until creamy.
I then combined two egg yokes, 1 cup of golden syrup with the mixture before adding five cups of plain flour, 2 tablespoons of ground ginger, 2 teaspoons of mixed spice and 2 teaspoons of bicarbonate soda.
I then kneaded the dough until it combined before resting it in the fridge for half an hour. Here is the dough rolled out. Note I've decided to used a dough slicer. After laying all the pieces out carefully, I baked all the pieces for 11 minutes and even had enough left over to make a batch of gingerbread for the Improvised Theatre Class. I then lay all the pieces flat to cool, before cling wrapping them overnight. I then rose at 5am to melt the sugar, burn my fingers and glue the pieces together.
So here is the finished result. It's super ugly, but she loved it. As I said earlier, Amy has put up with me for the best part of a decade and I hope to continue to be a part of her life. Happy birthday, gorgeous girl!
Saturday, March 19, 2011
Ninjabread
"Gee, Brain. What are we going to tonight?" "The same thing we do every night, Pinky. Try to take over the world."This particular evening I was planning to take the over the world by baking an army of gingerbread ninjas and I started by doubling this recipe from Taste.com. I beat 250g butter with 1 cup of brown sugar until it was creamy, before adding 2 egg yolks and one cup of golden syrup.
After this wet mixture was combined I added five cups of plain flour, 2 tablespoons of ground ginger, 2 teaspoons of mixed spice and 2 teaspoons of bicarbonate soda. Note how ominously full the mixing bowl looks.
After combining all the ingredients, I lightly kneaded the mixture until it started to form a dough. I then placed the cling wrapped bowl into the fridge for half an hour.
At this stage you should preheat your oven to 180°C. After chilling you dough you can roll it to a 4mm thickness and cut with your favourite cutters. The shapes should be baked in the oven for 10 minutes and then set aside to cool. This photo looks a tad like a crime scene ...
Make the icing by beating the remaining egg whites until stiff and adding two cups of pure icing sugar. Pictured is my favourite icing tool, the Cuisipro Decorating Pen. It gives much better control then a piping bag for an intricate job like this one.
Here are my little ninjas all iced and waiting to set. I can taste world domination already ...
Unfortunately my ninja army was foiled by cellophane, organza ribbons and these adorable little tags by Luvs2create2. Sighs ... I always thought by 21 I would have least conquered my first small tropical nation ... ah well ... there is always another night!Sunday, February 20, 2011
Chocolate and Hazelnut Biscotti
Since my traditional biscotti adventure was so successful I decided to try my hand at Chocolate and Hazelnut Biscotti. Chocolate, hazelnuts, cinnamon and orange rind are some of my favourite flavours so what could go wrong?
So what went wrong? Nothing really. They look biscotti but I felt they didn't satisfy the cravings of a chocolate lover. I'm thinking I might need to add butter and melted chocolate to the dough and integrate some chocolate pieces next time round.
Saturday, February 19, 2011
Chicken and Cheese Dog Treats
You would think this is the face that launched a thousand pet treats but you're wrong. I'm off to visit Dean, Skye and their new baby, a Golden Labrador puppy named Penny and made her a bag of Chicken and Cheese Dog Treats. These treats are modelled off this recipe and I've fine tuned them with the help of Baci. So easy to make and most of the ingredients are already in your pantry. Ingredients:
- 1 cup rolled oats
- 75g unsalted butter
- 1 cup boiling water
- 3/4 cup polenta
- 1 tablespoon caster sugar
- 1 tablespoon powered chicken stock
- 1/2 cup milk
- 1 cup shredded cheddar cheese
- 1 egg, beaten
- 2 and 1/2 cups of plain flour
Method:
Preheat the oven to 180°C and lightly grease four cookie trays. In a large bowl add the rolled oats, butter and the cup of boiling water. Allow the mixture to stand for 10 minutes.


Monday, January 31, 2011
Perfect Choc Chip Cookies
At lunch time today I slipped on the biggest darkest pair of sunglasses and wandered down to Black Pearl Epicure to stock up on pantry essentials. This means purchasing fine Valrhona cocoa powder, Callebaut choc chips and dark chocolate vermicelli (for fairy bread of course. It's the business). Valrhona and Callebaut will always be my pantry essentials of choice as if you are going to make something with chocolate, you need to use the best. Valrhona is a French company and is the only chocolatier to produce chocolate from a single variety of bean from a sole harvest. I tend to favour their cocoa powder as it has greater depth of colour than Callebaut. However Callebaut hasn't become the largest chocolate manufacturer in the world by being lacklustre. Callebaut specialises in Belgian chocolate for baking and leaves a lovely full bodied feeling in the mouth. I really like a 70% dark chocolate for eating as I feel 85% is a touch too bitter for the palette. Hold that thought as it will be a lovely segway into my next baking adventure. The quest for perfect Choc Chip Cookies!
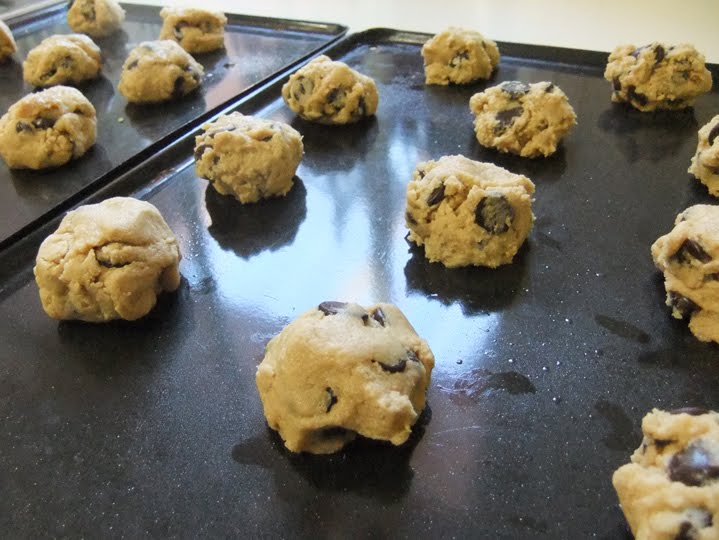
I've been invited to a morning tea at work tomorrow so I decided to whip up something quick and settled on Choc Chip Cookies. My Mother has always been a fan of crunchy style cookies, whereas I love a softer texture as it works in harmony with a glass of milk and you're less likely to be caught out by work mates when you're snacking. For those people who follow my preference, I think I've found the perfect recipe on Taste.com.au and it's dead easy. You start by beating all your wet ingredients until they become creamy and then fold in your dry items. You then get the most beautiful dough.
This dough is extremely pliant and it's a satisfying process forming lovely petite domes across a cookie sheet.
After 12 minutes in the oven you're left with light, crisp on the outside and moist on the inside cookies. If you have followed my directions and used the best chocolate you can afford, you should have the most perfect choc chip cookies possible. You'll never want to buy a packet from the supermarket again.